Certbot is a free, open-source software tool for automatically using Let’s Encrypt certificates on manually-administrated websites to enable HTTPS.
You’ll need to install snapd and make sure you follow any instructions to enable classic snap support.
Follow these instructions on snapcraft’s site to install snapd. install snapd
1. Install snapd
Pre-Installed with :Ubuntu 20.04 LTS (Focal Fossa), Ubuntu 18.04 LTS (Bionic Beaver), Ubuntu 16.04.4 LTS (Xenial Xerus) and etc.
Installing snap on CentOS
sudo yum install snapd
// With the EPEL repository added to your CentOS installation, simply install the snapd package:
sudo systemctl enable --now snapd.socket
// Once installed, the systemd unit that manages the main snap communication socket needs to be enabled:
sudo ln -s /var/lib/snapd/snap /snap
// To enable classic snap support, enter the following to create a symbolic link between /var/lib/snapd/snap and /snap:
2. Ensure the snapd is up to date
sudo snap install core; sudo snap refresh core2. Remove any Cerbot OS packages
sudo apt-get remove certbot
sudo dnf remove certbot
yum remove certbot- OS package manager like apt, dnf, or yum
3. Install Certbot
sudo snap install --classic certbot4. Prepare the Certbot command
Execute the following instruction on the command line on the machine to ensure that the certbot command can be run.
sudo ln -s /snap/bin/certbot /usr/bin/certbot5. Request a Let’s Encrypt SSL wildcard certificate
Begin the process of requesting a certificate from Let’s Encrypt. Using Certbot, request a wildcard certificate, which lets you use a single certificate for a domain and its subdomains.
Enter the following commands to set an environment variable
DOMAIN=anote.dev
WILDCARD=*.$DOMAIN
echo $DOMAIN && echo $WILDCARD
anote.dev
*.anote.dev- DOMAIN: Change anote.dev to your domain. (
yourdomain.com)
6. Set up manual authorization method with DNS challenges to verify domain ownership by Certbot
sudo certbot -d $DOMAIN -d $WILDCARD --manual --preferred-challenges dns certonlySaving debug log to /var/log/letsencrypt/letsencrypt.log
Plugins selected: Authenticator manual, Installer None
Obtaining a new certificate
Performing the following challenges:
dns-01 challenge for anote.dev
dns-01 challenge for anote.dev
- - - - - - - - - - - - - - - - - - - - - - - - - - - - - - - - - - - - - - - -
NOTE: The IP of this machine will be publicly logged as having requested this
certificate. If you're running certbot in manual mode on a machine that is not
your server, please ensure you're okay with that.
Are you OK with your IP being logged?
- - - - - - - - - - - - - - - - - - - - - - - - - - - - - - - - - - - - - - - -
(Y)es/(N)o: Y
- - - - - - - - - - - - - - - - - - - - - - - - - - - - - - - - - - - - - - - -
Please deploy a DNS TXT record under the name
_acme-challenge.anote.dev with the following value:
Vhf1KPxSScigKnaFWOLFclDJZzeFffmzXXXXXXXXXX
Before continuing, verify the record is deployed.
- - - - - - - - - - - - - - - - - - - - - - - - - - - - - - - - - - - - - - - -
Press Enter to Continue
- - - - - - - - - - - - - - - - - - - - - - - - - - - - - - - - - - - - - - - -
Please deploy a DNS TXT record under the name
_acme-challenge.anote.dev with the following value:
WxmQJD7KSQhNFykQ1v7Zjl1XX9ZkVquKrXXXXXXXXXX
Before continuing, verify the record is deployed.
(This must be set up in addition to the previous challenges; do not remove,
replace, or undo the previous challenge tasks yet. Note that you might be
asked to create multiple distinct TXT records with the same name. This is
permitted by DNS standards.)Before continuing, verify the record is deployed. This must be set up in addition to the previous challenges.
7. Add TXT records to your domain’s DNS zone
Add TXT records for verification.
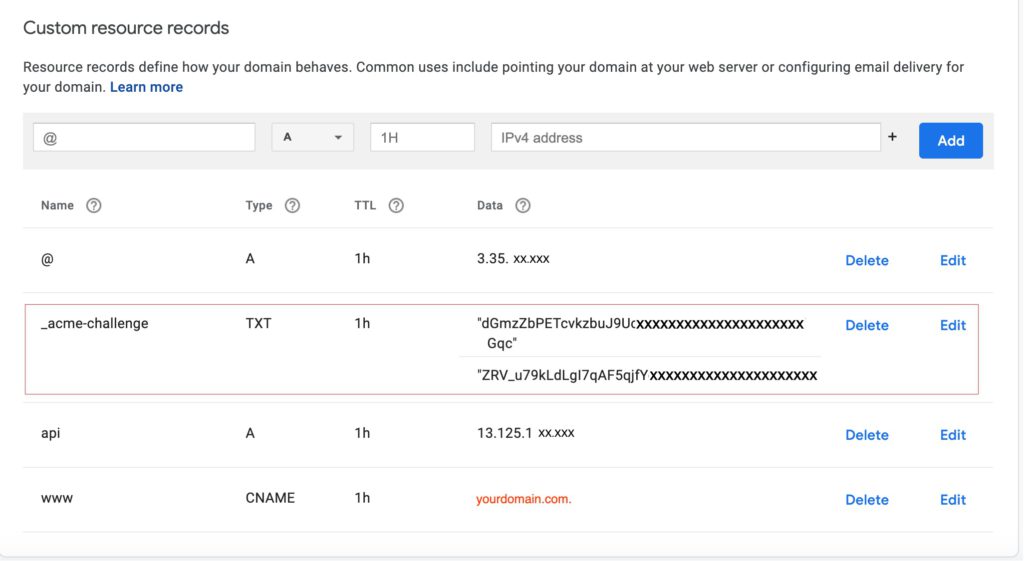
An example is Google Domain
8. Verify the record is deployed
Go to https://mxtoolbox.com/TXTLookup.aspx. and enter your domain name for checking the domain is verified.
9. Obtain certs keys
Your certificate and chain will be save at: /etc/letsencrypt/live/yourdomain.com
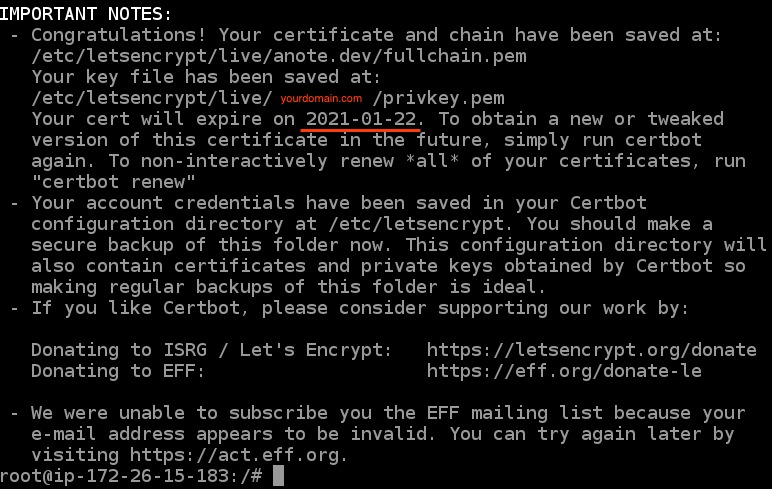
Three months certification.
Create links to the Let’s Encrypt certificate files in the Apache server directory
sudo /opt/bitnami/ctlscript.sh stopDOMAIN=anote.dev
WILDCARD=*.$DOMAIN
echo $DOMAIN && echo $WILDCARD
anote.dev
*.anote.devFor Debian Linux distributions
Approach A (Bitnami installations using system packages):
sudo mv /opt/bitnami/apache2/conf/bitnami/certs/server.crt /opt/bitnami/apache2/conf/bitnami/certs/server.crt.oldsudo mv /opt/bitnami/apache2/conf/bitnami/certs/server.key /opt/bitnami/apache2/conf/bitnami/certs/server.key.oldApproach A (Bitnami installations using system packages):
sudo ln -sf /etc/letsencrypt/live/$DOMAIN/privkey.pem /opt/bitnami/apache2/conf/bitnami/certs/server.keysudo ln -sf /etc/letsencrypt/live/$DOMAIN/fullchain.pem /opt/bitnami/apache2/conf/bitnami/certs/server.crtStart
sudo /opt/bitnami/ctlscript.sh startIntegrate the SSL certificate with your WordPress site using the Really Simple SSL plug-in
For newer instances that use the Debian Linux distribution:
sudo chmod 666 /opt/bitnami/wordpress/wp-config.php && sudo chmod 666 /opt/bitnami/apache/conf/vhosts/htaccess/wordpress-htaccess.conf