If you are deploying an application on Kubernetes, and you probably want to access the application with www.<myapplication>.com
Imagine, you build the application into a Docker image and deploy it on the Kubernetes cluster as a pod in Deployment. Also, your application need a MongoDB database
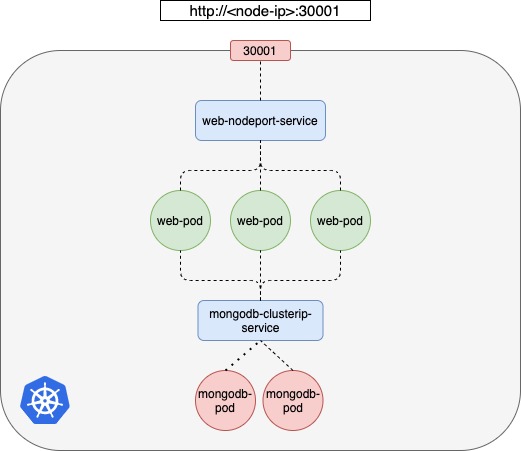
So, you also want to deploy a mongodb database as a pod and create a service of type ClusterIP called mongodb-clusterip-service to make it accessible to the MongoDB database.
apiVersion: v1
kind: Pod
metadata:
  name: mongodb-pod
  labels:
    app: mongodb
spec:
  containers:
    - name: mongodb-container
      image: mongo
      imagePullPolicy: IfNotPresent
      ports:
        - containerPort: 27017
          protocol: TCP
apiVersion: v1
kind: Service
metadata:
name: mongodb-clusterip-service
spec:
type: ClusterIP
ports:
- targetPort: 27017
port: 80
selector:
app: mongodb// Create MongoDB pod and ClusterIP Service
$ kubectl create -f mongodb-pod.yaml
pod/mongodb-pod created
$ kubectl create -f mongodb-clusterip-service.yaml
service/mongodb-clusterip-service created
// Check the MongoDB pod and Service
$ kubectl get pods -o wide
NAME READY STATUS RESTARTS AGE IP NODE NOMINATED NODE READINESS GATES
mongodb-pod 1/1 Running 0 10s 172.17.0.3 minikube <none> <none>
$ kubectl get service
NAME TYPE CLUSTER-IP EXTERNAL-IP PORT(S) AGE
mongodb-clusterip-service ClusterIP 10.99.96.212 <none> 80/TCP 6sNow, your Mongo DB database is working inside the Kubernetes cluster. The dataBase, you probably want to only access in the Kubernetes Cluster.
However, your web application should be accessible to the outside world. To make the application accessible to the outside world, you need to create another type of service for web application which is NodePort and make the application available with the port on the nodes in the Kubernetes Cluster.
apiVersion: v1
kind: Pod
metadata:
  name: web-pod
  labels:
    app: web-pod
spec:
  containers:
    - name: web-pod-container
      image: jayjodev/k8s-app-db:latest
      ports:
        - containerPort: 4000
          protocol: TCP
apiVersion: v1
kind: Service
metadata:
name: web-nodeport-service
spec:
type: NodePort
ports:
- targetPort: 4000
port: 80
nodePort: 30001
selector:
app: web-pod// Create Web pod and NodePort Service
$ kubectl create -f web-pod.yaml
pod/web-pod created
$ kubectl create -f web-nodeport-service.yaml
service/web-nodeport-service created
// Check the Web pod and Service
$ kubectl get pods -o wide
NAME READY STATUS RESTARTS AGE IP NODE NOMINATED NODE READINESS GATES
web-pod 1/1 Running 0 81s 172.17.0.4 minikube <none> <none>
// kubectl get service
NAME TYPE CLUSTER-IP EXTERNAL-IP PORT(S) AGE
web-nodeport-service NodePort 10.110.165.250 <none> 80:30001/TCP 63sAccess the web application with NodePort Service.
$ minikube ip
192.168.64.5

$ curl http://192.168.64.5:30001
This is Node.js for Testing Kubernetes MongoDB and Redis Connection. Also, ConfigMap and Secrets can be tested.
Now, user can access your app with http://<any-node-ip-in-cluster>:<NodePort-service-port>
This setup works and users are able to access the application. Whenever traffic increases, we increase the number of replicas of the pod to handle the additional traffic and the service takes care of splitting traffic between the pods.

However, If you have deployed a production grade application before you know that there are many more things involved in addition to simply splitting the traffic between the pods.
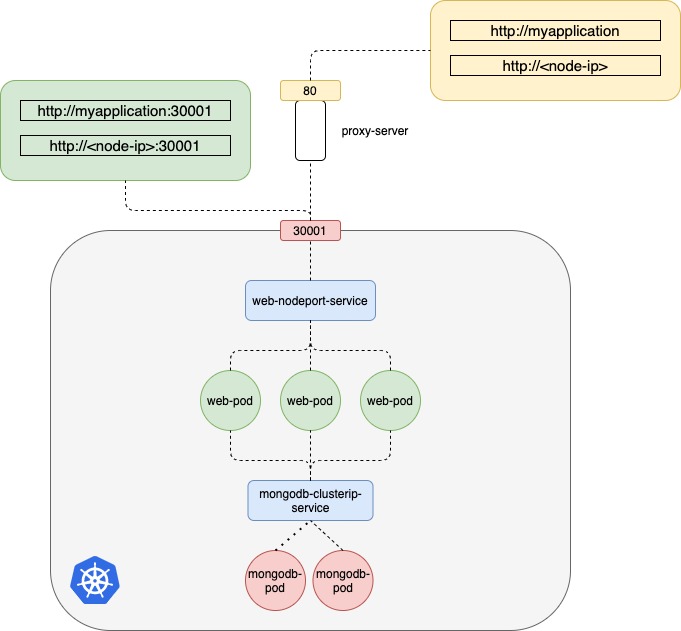
- we do not want the users to have to type in IP address every time, so DNS server to point the IP of the node.
- curl http://192.168.64.5:30001
- curl http://www.myapplication.com:30001
$ minikube ip
192.168.64.5

// Add node-ip to DNS server.
$ cat /etc/hosts
192.168.64.5 www.myapplication.com

$ curl http://192.168.64.5:30001
This is Node.js for Testing Kubernetes MongoDB and Redis Connection. Also, ConfigMap and Secrets can be tested.

$ curl http://www.myapplication.com:30001
This is Node.js for Testing Kubernetes MongoDB and Redis Connection. Also, ConfigMap and Secrets can be tested.
Now, users can access the web application with URL www.myapplication.com:30001
2. Users also do not want to remember port numbers either. However, NodePort Service can only allocate high numbered ports that are greater than 30000. So, you bring in an additional layer between the DNS server and the cluster like a proxy server that proxies requests on port 80 to port 30001 on the node. You then point to the DNS server. Now, users can access the web application by simply type http://www.myapplication.com.

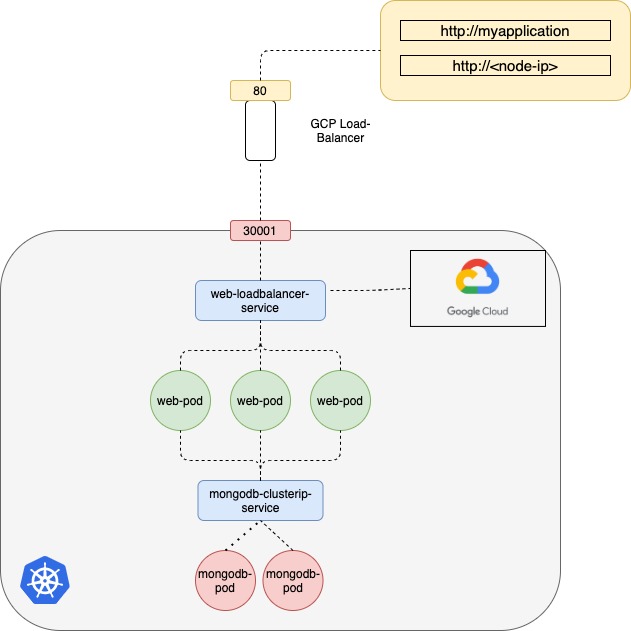
What if your Kubernetes Cluster on a public cloud environment like Google Cloud Platform?
If you set Loadbalancer service type, Kubernetes still do everything that it has to do for a NodePort, which is to provision a high port for the service, but in addition to that Kubernetes also sends a request to Google Cloud Platform to provision a network load balancer for the service on receiving the request Google Cloud Platform automatically deploy a load balancer configured to route traffic to the service ports on all the nodes and return its information to Kubernetes. The LoadBalancer has an external IP that can be provided to users to access the application.

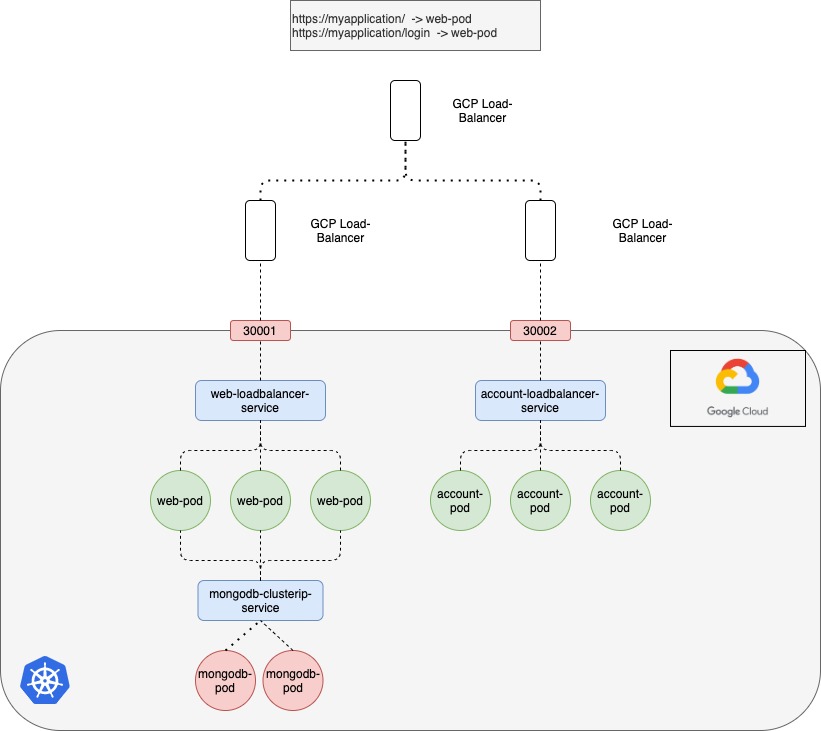
Now, What if your company is growing and you need more service for your customers. For example, account service the user should log in to your application. your service should provide like www.myapplication.com/login.
The developers developed the new account application as a completely different application as it has nothing to do with the existing one. However, in order to share the same cluster resources, you deploy the new application as a separate deployment within the same cluster. You can create a new Loadbalancer Service. The new load balancer has a new IP. You must pay for each of these load balancers and having many such load balancers can inversely affect the cloud build.
How do you direct traffic between each of these load balancers Based on the URL that users type in?
Now you need a new load balancer or proxy that can redirect traffic based on URLs to the diffenent services. Everytime you introduce a new service you have to reconfigure the load balancer and finally you also need to enable SSL for the applications, so users can access the application using https.
Where do you configure that?
It can be done at different levels either at the application level itself or at the load balancer or proxy server but you do not want the developers to implement it in their application as they would do it in different ways.
Thus, You want to be configured in one place with minimal maintenance. That is a lot of different configurations and all of this becomes difficult to manage when the application scales. It requires involving different individuals in different teams. You need to configure your firewall rules for each new service and it is expensive as well as for each service you cloud-native load balancer needs to be provision would not be nice.

What if Kubernetes can manage all of that within the Kubernetes cluster, and have all that configuration as just another Kubernetes definition file?
That is where Ingress comes in.
Ingress helps users access the application using a single externally accessible URL, that you can configure to route to different services within the cluster based on the URL Path. At the same time implement SSL security as well.
You can think ingress as a layer load balancer built-in to the Kubernetes Cluster that can be configured using native Kubernetes primitives.
With Ingress you still need to expose it to make it accessible outside the cluster. Going forward you are going to perform all the load balancing Auth, SSL and URL Based routing configurations on the Ingress controller.